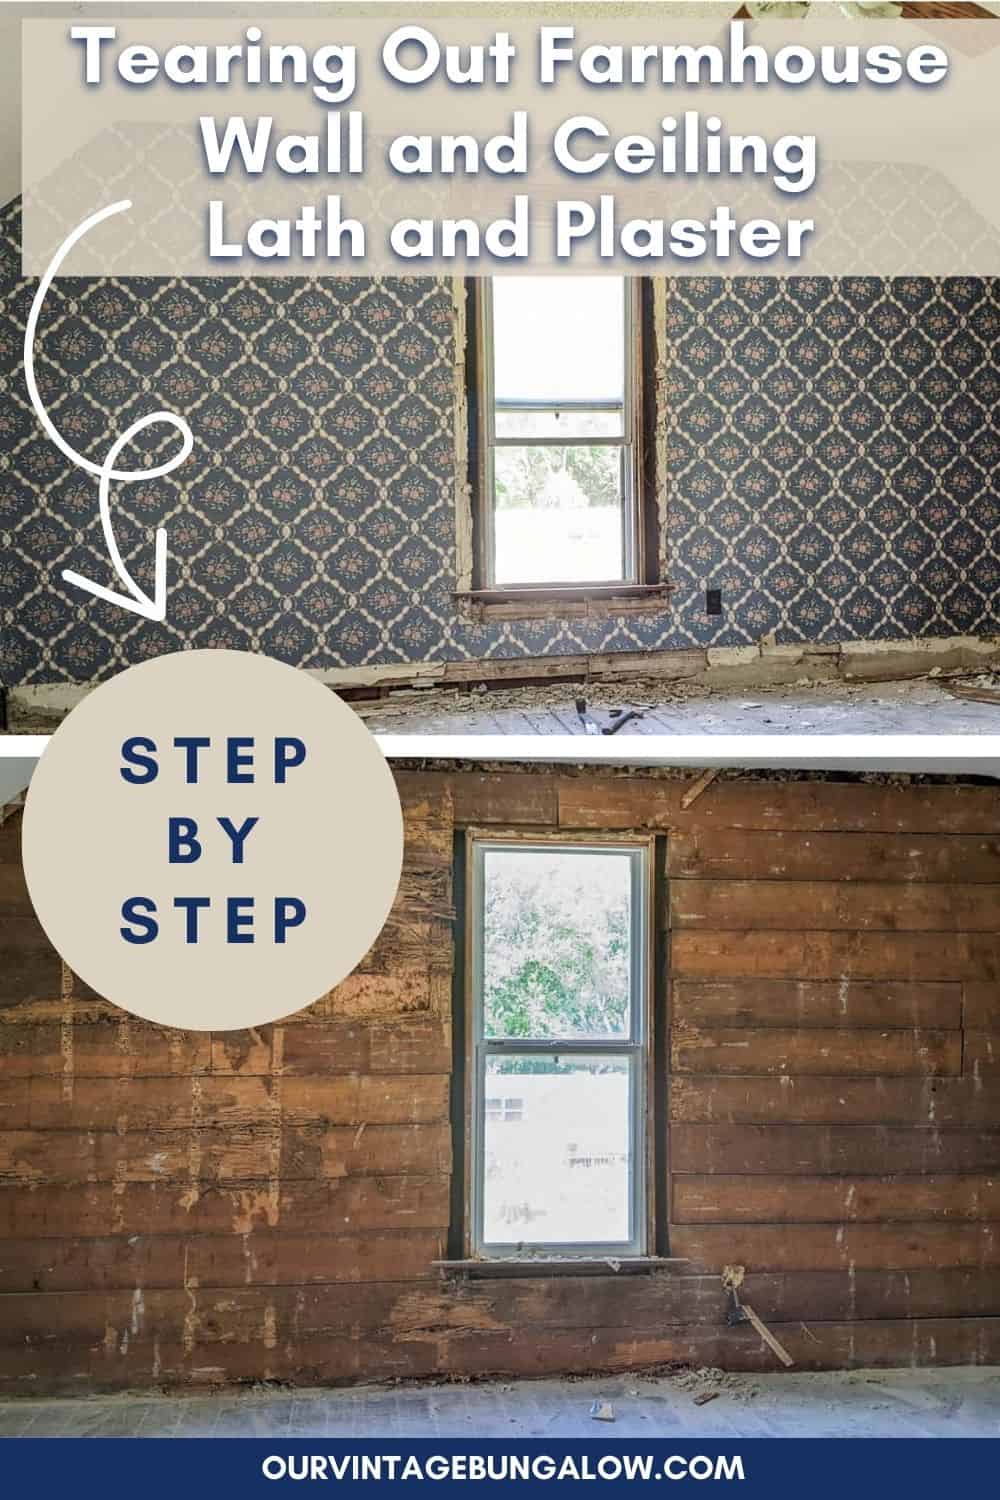
If you own a home built in the 1940’s or before, chances are you have run across lath and plaster walls. While plaster walls and ceilings in good condition can add an authentically antique look to home, it might also be crumbling and need to be removed. That was the case for our 1900 farmhouse renovation. Here is our step by step process how we accomplished tearing out farmhouse wall and ceiling lath and plaster with all the nitty (and quite literally) gritty details you should know.

As an Amazon Associate, I may earn a small affiliate commission through your purchase through any Amazon affiliate links on this post. This is at no additional cost to you. All recommendations are my own because I believe in each product. See my full Privacy Policy here.
In This Article

What is lath and plaster?
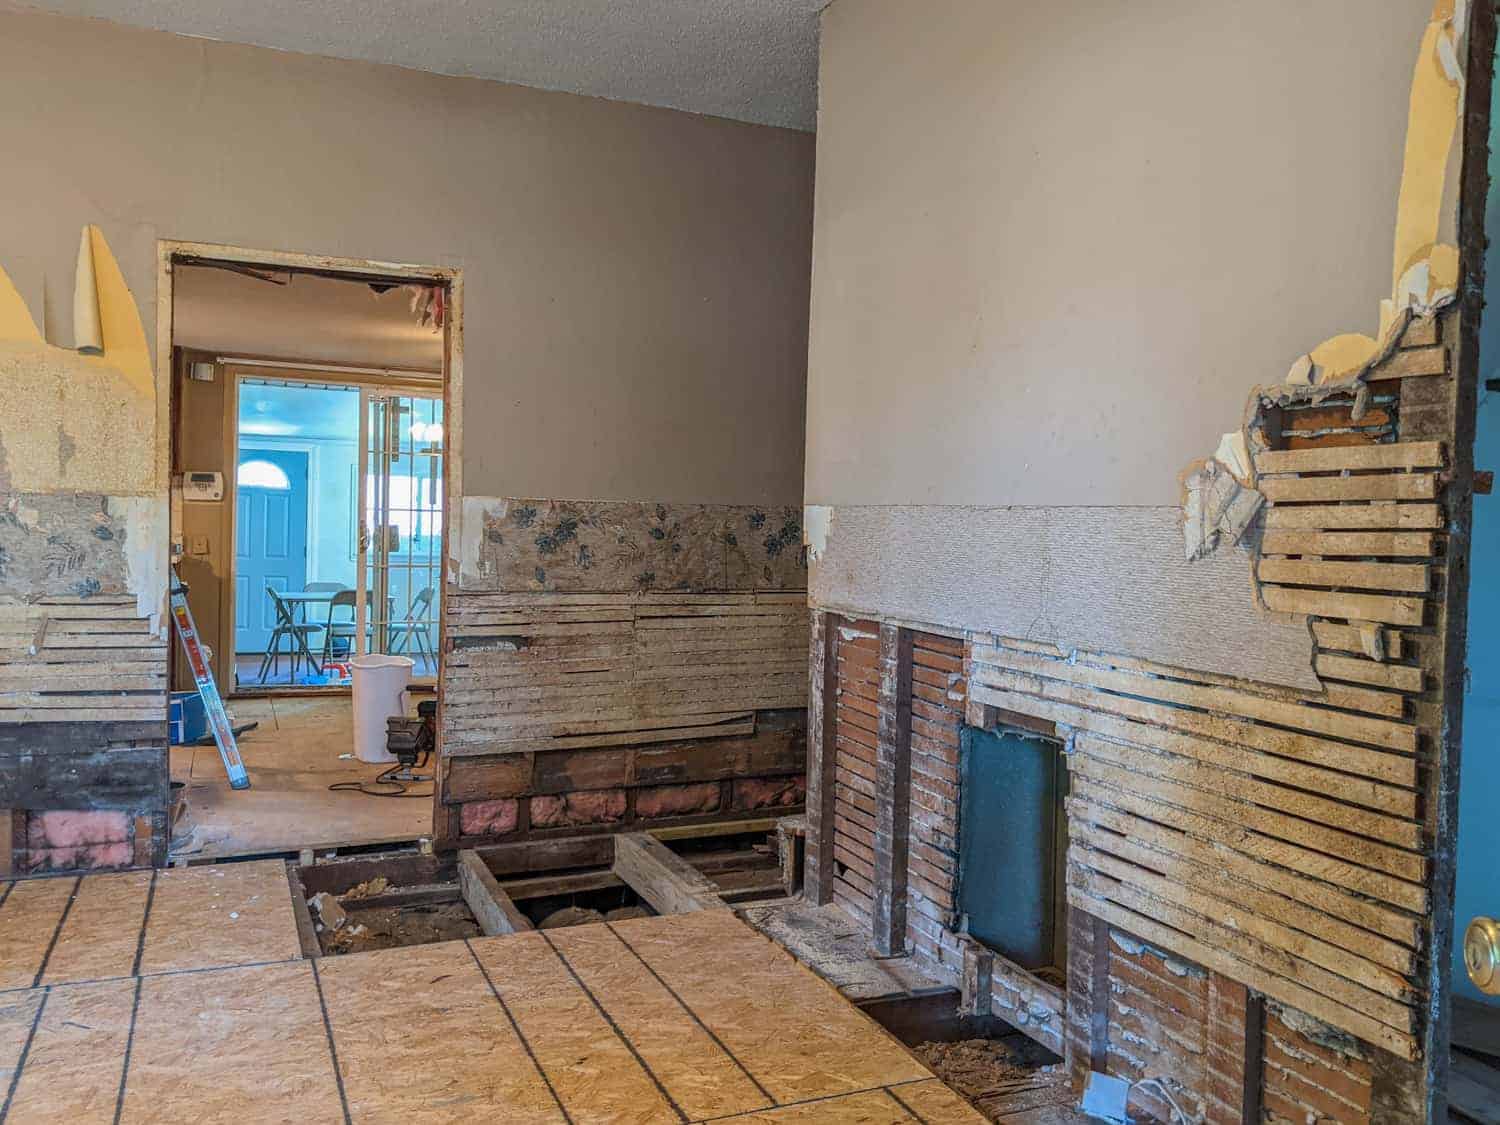
Lathe walls are usually 2 inch by 4 foot strips of wood that were nailed on studs to form a “wall.” Occasionally, metal lath or sheetrock lath has been used but not in your typical home built pre-1940’s. The lath was covered by three coatings of plaster. While the finished product was a relatively smooth wall, the fact that plaster was hand applied means there is a natural but subtle texture throughout the walls compared to a completely flat sheetrock board.
History
Horizontal strips of wood lath and plaster was first used in the 1700’s and continued to be the primary technique to finish interior walls until the 1940’s when modern gypsum plaster and sheetrock was introduced.
Material
Old plaster was made of lime, sand (or crushed stone), water and animal hair (usually horsehair plaster to bind it together and prevent shrinking). Yes, asbestos is a possible ingredient for some plaster. See below for a discussion of asbestos in your plaster walls and ceilings.
Pros of Lath and Plaster
There are several good reasons of having lath and original plaster walls (even if they contain asbestos, so don’t freak out yet).
- Insulation – Lath and plaster construction provide several layer of insulation, and I will tell you, it works great! I remember the first summer of working in our farmhouse with no AC. We would walk into the closed up house and feel an immediate coolness.
- Old World Antique Charm – Since it’s hand applied, plaster has a textured “movement” that gives an authentic Old World wall look. The completely flat finish of sheetrock looks newer.
- Application Around Curves – Plaster is much easier to apply around curves like pass-through arches in older homes and corners.
- Lasts Longer – Properly cared for without water damage, plaster will last twice the lifespan of sheetrock (if not more). (See below to decide if you need to tear out your lath and plaster or leave it.)
- Historic Homes Accuracy – Sheetrock simply wasn’t used in certain eras, so if you are meticulously preserving the history of a home or building, you would want to use lath and plaster work.
Cons of Lath and Plaster
- Insulation – Yes, insulation is both on the pro and con list. While lath and plaster itself is good insulation, old homes did not have adequate, if any, insulation inside the walls. Many times blown insulation was added in decades later, but this is difficult to get in all the interior wall spaces and settles over time, leaving gaps of uninsulated wall.
- Crumbling – Once damaged, plaster crumbles very badly and is difficult to patch. If you do decide to patch or replace old walls with new plaster you need to hire a professional, which is expensive.
- Access to Wiring or Plumbing – It is very, very difficult to get to or add wiring, plumbing and HVAC behind lath and plaster walls. Wiring can be re-strung with difficulty (and added cost for the time spent), but if you need plumbing or HVAC added to your walls or ceiling, you will likely need to tear out some areas or come up with some creative alternatives (or simply go without forced heating and air as many farmhouse still do).
What Is the Toxic Danger of Removing Lath and Plaster?
Does lath walls and plaster contain asbestos or lead? This subject has many home renovators concerned as these harmful products were often used in building materials from 1940’s – 1980’s. The answer is maybe.
Toxins In Building Materials
- Asbestos – This was used in standard plaster beginning in the 1940’s, post-World War II. It could have been in some plaster (mostly decorative plaster) as early as the 1910’s. If you see horsehair in your plaster, then it likely does not contain asbestos. NOTE: popcorn on ceilings sometimes contained asbestos, so check that material before you tear everything out.
You can test if your plaster walls and ceilings have asbestos by cutting a sample and mailing it to a lab in an asbestos testing kit you can get from Amazon HERE. Or you can have a professional come to your location and test it.
- Lead – Plaster was not made with lead. However, paint on the plaster walls of old homes will possibly have lead in it. You can test if your walls have lead with simple in home lead test kits found HERE.
- Mold – While not commonly considered when tearing out old homes, we’ve discovered that mold is a very real concern. Fortunately, you can easily see this toxin and then protect yourself during demolition.
How Concerned Should I be About Toxins?
The following is my opinion on the subject based on the four home renovations in my lifetime. It is not scientific. I am not advising but merely stating my opinion and experience.
- If you are hyper-concerned about toxins such as asbestos and lead to the point of hiring everything professionally removed, then don’t renovate an old house. (And by “old” I mean anything 1980’s or before.) Professional removal of toxic materials is extremely expensive.
- Asbestos is not dangerous until it is airborne. If you live in a house with undisturbed building materials containing asbestos, you will not be in danger from it. Lead is not dangerous unless ingested or the dust is breathed or on the skin. Again, if it is not disturbed (or your kid isn’t literally chewing on the lead painted walls) it is most likely fine.
- Toxins in America is part of life, unfortunately. Yes, I have gone down the rabbit hole and freaked out about our past exposure to asbestos, lead and mold. But in the rabbit hole, I discovered that asbestos is STILL used in some crayons and toys. Crazy, right??? What I’m saying is that while we should protect ourselves, we are still going to be exposed somewhere to toxins.
With that said, I should have been more careful in our farmhouse demolition. Some medical tests that I did (for other health reasons) revealed that I have a high level of toxins in my system. Boo. We jumped right into the farmhouse demolition and didn’t think much about possible exposure. I did know that asbestos wasn’t in our plaster, but I’m not sure about the sheetrock or insulation. And then there was the mold… While we did use paper masks and lots of ventilation, it was still a dusty mess. I will be more aware and cautious going forward. (FYI, during the major parts of demolition, we did keep the kids away.) Do I regret not taking our safety more seriously? Yes. But all I can do is heal and move forward as safely as possible. Know better; do better.

Should I Remove Lath and Plaster?
I would not advise removing lath and plaster in your renovation project unless it’s damaged or you need extensive access behind the walls. The original walls in decent shape will give your home an authentic feeling that can’t be (cheaply) replicated. And it’s just too much dang work and mess. Even small areas
We chose to remove our lath and plaster walls and ceiling as the best solution for a number of reasons, primarily because it was a crumbling mess in many areas. Downstairs, paneling had been added in the 1970’s, and this decimated the plaster behind it.
Also, we needed to add/update plumbing, electrical wiring and HVAC in the entire house. This is nearly impossible without removing the walls.
Safety Apparel and Tools
What is Good Demolition Safety Apparel?
The following is the very least you need in safety apparel:
- Respirator Mask
- Safety Goggles
- Women’s Work Gloves (these are fantastic!)
- Men’s Work Gloves
- Thick Soled Work Boots (there are tons of nails in lath, and you will most likely step on one even if you’re being careful)
If your materials have tested positive for asbestos or lead, I highly recommend adding the following safety clothing:
What Test Kits to Use for Home Toxins
What Tools Should I Use for Removing Lath and Plaster?
Wall Removal
- Oscillating Cutter with Semi-Circle Blade
- 10 Pound Sledge Hammer
- 3 Pound Sledge Hammer
- Heavy Duty Hammer
- Nail Puller Crow Bar
- 2 Foot Wrecking Pry Bar
- 3 Foot Wrecking Pry Bar (I used both the 2 and 3 foot pry bars in different areas. You could get away with just one size though.)
Ceiling Removal
- Oscillating Cutter with Semi-Circle Blade
- 4 Foot Wrecking Pry Bar
- Nail Puller Crowbar
- Tall Ladder
- A Strong Man (Seriously. I did some of the ceiling removal and was very glad to hand it over to someone with a lot more upper body strength!)
What is Behind Lath and Plaster Walls?
Before you start punching holes in walls and ripping away, you need to be aware of what’s behind the lath and plaster. While you don’t usually have a super clear picture of the layout, you can get a pretty good idea of areas to be cautious around.
- Electrical Wiring – This is the most concerning item behind lath and plaster walls. Honestly, wires could be anywhere. Use common sense around outlets, lights and switches. Wires tend to run about 1 – 2 feet off the floor. Once you make a hole, look down into the wall to see if any wires are around.
- Plumbing – Don’t go jamming your wrecking bar into the wall with reckless abandon. Just like with wiring, use common sense in areas the might have pipes (like bathrooms and kitchens). Once a hole is poked into the wall, look around to see what there is.
- Insulation – Insulation isn’t dangerous to tear into…unless it has toxins in it. Just because your plaster is toxin free doesn’t mean your insulation is. Actually, asbestos insulation was very, very common. (I found that out after our whole house demo was done.) Send insulation in for a test and wear the proper safety apparel.
- Mouse Tunnels, Rats Nests, Snake Skins and Mud Daubers – These are obviously not dangerous per se, but they will make you cringe. We found all these in our walls, and I’ll wager they’re in most old farmhouse walls.

How to Remove Lath and Plaster?
Once you’ve decided to tear out your wall or ceiling lath and plaster, now comes the “fun” part! Grab your sledge hammer and let’s get going.
Set up the Area
If you are just tearing out one or a couple rooms in your home and are occupying the rest of the house, you MUST seal off the rooms you are working on. There is so much dust that will sift through small cracks. It still will sift through a little, but you can greatly minimize your mess. Don’t skip this step.
- Furniture and Decorations – Don’t try to do this project with furniture in the room. It will get filthy and be in the way. Move everything out.
- Doorways – Seal off the doorways with plastic and painter’s tape.
- Floor – Lay down heavy duty floor protection and tape into place (even if you’re refinishing your floors later). You are basically throwing chunks of plaster and scraping nails against your floor. I recommend Ram Board. It come in a roll but is heavy duty (still, you might need a couple layers). Some people recommend 1/8 inch particle board, but this can get expensive. Cloth and plastic drop cloth do not work as you will need to shovel away the debris and these move too much. Also, they are not thick enough for real protection. Use Ram Board tape to secure.
- Vents – Cover your HVAC vents with Ram Board (floor) or plastic (floor, walls and ceiling) to keep plaster dust from the entire house.
- Windows – Open your windows when you start working and place a box fan facing outside. You NEED ventilation and a way to move the dust out.

Method for Removing Wall Lath and Plaster
I’m sure there are several ways of doing this, but here is the best way that worked for me when tearing out the lath and plaster for the entire farmhouse (and for some rooms in our previous home).
If you are wanting to save plaster walls that join up to the removal part, you will need to cut a line where you want the demo to stop. This prevents cracking in the plaster you want to save. Run painter’s tape along the edge of the wall you want to save, making sure it is straight with the straight edge of a level. Then cut along the edge of the tape. Once you remove the plaster from the cut edge, cut again along the edge of the lath. Lath runs in 4 foot strips so it will likely be running under the plaster you want to save.
2. Hammer, Sledgehammer, Crowbar and Pry Bars
Now comes the part where you will just experiment to find your groove if this is your first time on this kind of work. There are several different methods depending on if you are saving the wall behind the demo wall, if you already have open access behind the demo wall or if you are demo-ing two intact walls that are back to back.
Remember to look out for wiring and plumbing!
- When two walls back to back (on either side of the same stud) are being demolished:
Knock a hole in the wall with a sledge hammer. Then stick the long flat bar (pry bar) behind the lath boards and start prying off using the wall behind it as leverage.
- Saving the wall behind the wall you are demolishing
If you are saving the wall behind your de-construction, you will need to take a more cautious approach. Scrape off the plaster with the flat edge of the crowbar or use a scraper and the pry off the lath boards using the stud as leverage.
- Open access behind the wall you are demolishing
Go around behind the wall you are demolishing with a 3 or 4 foot sledgehammer. Bang the lath off with the flat “head” of the hammer between the wall studs. It is easier to “push” the lath off from behind than “pull” it off from the front.
3. Crowbar or Hammer
Once the lath and plaster have been removed and cleaned up (see below for cleanup instructions), remove the thousands of tiny nails with the claw of a hammer or crowbar.


Method for Removing Old Ceiling Lath and Plaster
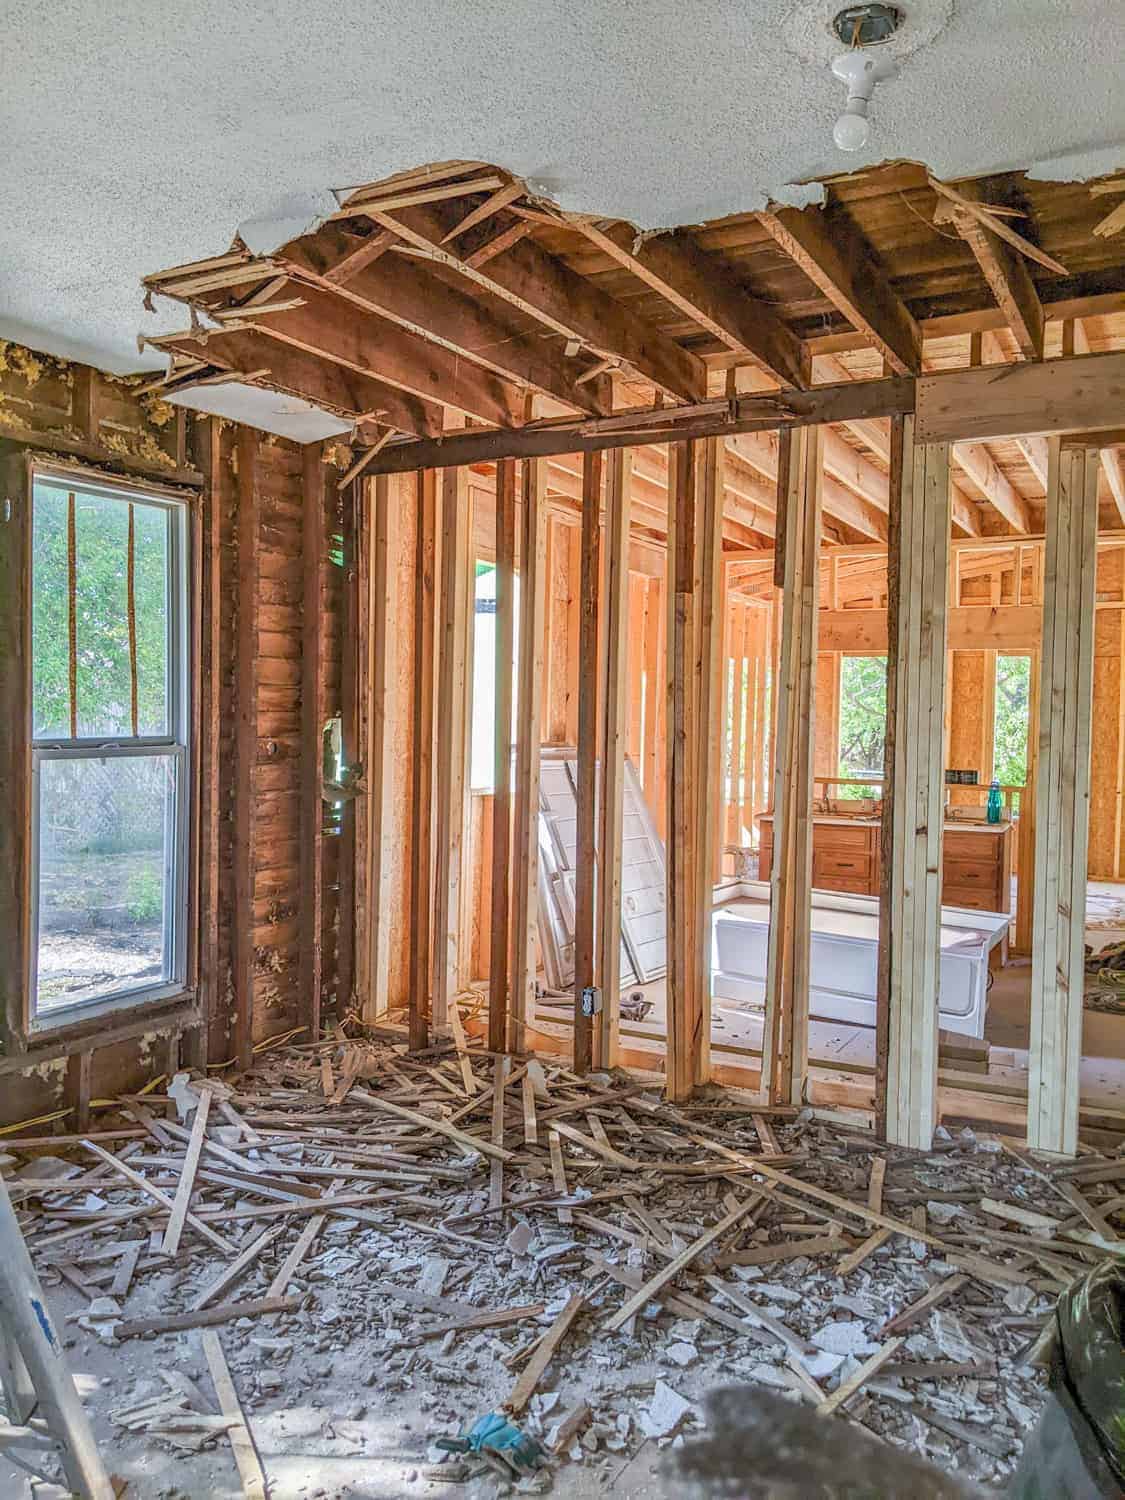
Removing lath and plaster from the ceiling is more straight forward but ooooh, so much work! We have 9 1/2 foot high ceilings, so it really gives you an upper body workout. Remember to be cautious about electrical wire and light fixtures.
If you are wanting to save plaster ceiling that joins up to the removal part, you will need to cut a line where you want the demo to stop. This prevents cracking in the plaster you want to save. Run painter’s tape along the edge of the wall you want to save, making sure it is straight with the straight edge of a level. Then cut along the edge of the tape. Once you remove the plaster from the cut edge, cut again along the edge of the lath. Lath runs in 4 foot strips so it will likely be running under the plaster you want to save.
2. 4 Foot Long Pry Bar
Really, the longer the better if you have tall ceilings. You don’t want to stand on tiptoe. Strongly jab the top of the curved end of the pry bar and make a hole into a section of plaster. Once a hole is made, you simply insert the hooked curve of the pry bar above the lath between the ceiling joists and pull hard. You will want to work a bit ahead of where you’re standing because everything comes tumbling down and is a big mess.
3. Crowbar or Hammer
Once the lath and plaster have been removed and cleaned up (see below for cleanup instructions), remove the thousands of tiny nails with the claw of a hammer or crowbar.

How To Clean Up Lath and Plaster?
My method of removing walls and ceilings takes both the lath and plaster off at once. This saves a steps but also means you have sticks of lath mixed in with piles of plaster. I have never had a problem easily separating the two, however.
Cleaning Up Debris
- Pull Out Lath – Periodically, stop wall or ceiling removal to clean the area. Grab all the lath boards that are sticking up and you can see. Place long end up in a large plastic garbage can (with a handle). I do NOT use a trash bag for lath since it is varying lengths that are often longer than any bag can hold. See below for disposal options.
- Shovel Plaster – Once all the lath is removed from the pile, use a short handled, square edge shovel. Shovel into a construction trash bags. Do not fill the bag as this can get extremely heavy very quickly.
These are the best bags we have found and will even work for plaster with toxins in it (for dumpster regulations). As long as you don’t overfill them, they will not break.
- Remove and Bag Up Insulation – If you are removing any insulation in the walls, you will remove it after the lath and plaster are gone. Remember that this insulation was most likely blown in, possibly has asbestos in it and is very dusty. I recommend testing it for asbestos, but if you don’t then make sure you have protective goggles and mask on at the very, very least.
- Sweep the Room – Once the project is complete, do a final sweep
- Vacuum – Ideally, you will use a shop vac over the floor, edges and around exposed studs to get what the broom missed. There will be a lot of dirt!
How Do I Dispose of Lath and Plaster?
Getting Rid of Old Lath
There are several options when it comes to lath, which can be fun!
- Repurposing – Many people make crafts out of lath boards. They make great large stars for outside display at Christmas or other Rustic craft projects.
- Selling or Giving Away – Since some crafters and decorators use lath for projects, you can possibly sell or give it away on Craigslist or Facebook Marketplace. Make sure to tell people that there are nails in it or remove the nails before selling.
- Burning – Lath is simply wood. We live pretty far out in the country, so burning is how we disposed of the mountains of lath (and I do mean mountains). We have burned it in a burn barrel and our burn pit. Remember there are thousands of nails though, so when you dispose the ashes, you won’t be able to use them in your garden or on the ground. I would dispose of the ashes by scooping them into a contractor’s garbage bag and throwing in the trash dumpster.
- Rental Trash Dumpster – We have rented more trash dumpsters than I want to remember. This is the quickest way to dispose of lath.
- Local Dump – You can also take a load of debris to the local dump yourself. It is a little more work but a whole lot cheaper than renting a dumpster.
How to Get Rid of Plaster?
There are not a whole lot of ways to dispose of plaster other than throwing it into the dump. (If you have any other ideas, let me know in the comments below!) It is very important to bag it in contractor’s bags that won’t split. We have found THESE to be the very best. Just don’t fill them up as it gets extremely heavy.
**Asbestos plaster – I have called our local dumps, and they take asbestos building material trash as long as it’s bagged up securely. They do not throw it in any special area…it just goes in with the rest of the trash. If you’re concerned about it, you can call your dump. (Or you can just bag it securely and throw it in…because I assure you, they are receiving literally tons of asbestos material from deconstructed houses.)
- Contractor’s Garbage Bags (that won’t split) https://amzn.to/3SOeWCX
- Rental Trash Dumpster – By far the easiest way (but most expensive) to get rid of your trash. Rent a huge dumpster and throw bagged plaster in. They will haul away for you.
- Local Dump – Throw it in your truck or trailer and haul it to the dump for you. They will charge per ton.
Cost analysis in our Midwest area:
Dumpster Rental for approximately 20 foot x 8 foot x 4 foot tall dumpster – $650 for 2 tons. Extra charge for more weight.
Local Dump Charge – $45 per ton. You off load it from your pickup or trailer.

I trust that this in depth post on tearing out farmhouse wall and ceiling lath and plaster will help you in your own home (de)construction and renovation! Old houses are worthy of restoring to their former glory, but it does take extra knowledge and a lot of work. While this is a dirty and labor intensive project, it is always one of the simplest. Good luck on your project!
Comment below with any questions I might have missed, and I’ll be glad to help where I can!
Read More About Our 1900 Farmhouse Renovation Below
Where to Buy Authentic Materials for Old House Renovation (On a Budget)
Farmhouse Remodel Before Photos
Farmhouse Renovation During Pictures (2022)
Old Farmhouse Addition During Photos
Authentic Farmhouse Renovation – How I Chose New Windows
Antique Farmhouse Wallpaper Found During Renovation
Pin for Later Tearing Out Farmhouse Wall and Ceiling Lath and Plaster